Getting started with a soldering iron. What is needed for soldering. Using a homemade stinger
If we consider the methods of soldering, then the work performed by the soldering iron is the most common and convenient. Despite this, soldering with a soldering iron has two important limitations that should be considered when choosing a method. Soldering with a soldering iron should only be done with low-melting solders and it is difficult to perform the necessary manipulations if the parts to be soldered are too massive.
The last difficulty can be overcome if you use additional heat sources, such as a gas or electric stove, gas burner. Using these sources, you can achieve the desired result by heating the soldered part, although this will complicate the whole process.
To start the soldering process, you need prepare the right tool and special materials. First of all, of course, the soldering iron itself is needed, and it is clear that you cannot do without flux and solder.
The most common soldering devices are electric soldering irons because they are easy to use and easy to get. The desired soldering tool is selected depending on its power, which shows the level of heat flow directed to the soldered parts.
It will be correct to solder electronic components with a device whose power will not exceed 40 watts. If the parts to be soldered have walls or wires that do not exceed one millimeter, then it would be appropriate to choose a tool in the range of 80–100 watts. If the wall of the part is two millimeters or more, then the power needed is more than 100 watts. Just such powerful tools include hammer-type soldering irons powered by electricity, which have a power of 250 watts, and also higher. Such powerful devices are required, as a rule, for the industry where you need to solder large parts. The price of such non-household appliances is correspondingly high.
Thermal conductivity of the soldered material must also be taken into account when choosing the power of the soldering iron. For example, when soldering steel products, it should be in a less heated state than when working with a copper structure.
Solders
For soldering with an electric tool, pure tin, tin-lead, tin-silver and other types of solders are used.
If it is necessary to solder the utensils used for cooking, then it will be correct to use only pure tin.
Fluxes
 According to experts, materials such as bronze, silver, nickel silver, copper, tin, gold, brass, and lead are well soldered. Quite acceptable you can solder nickel, low-alloy and carbon steels, zinc. Materials that are difficult to work with include aluminum, stainless, as well as chromium, high-alloy steels, aluminum bronze, cast iron, magnesium, and titanium. In practice, it can be noted that only an unprepared part or wire, an incorrectly selected flux and an incorrectly selected processing temperature lead to poor soldering.
So a properly selected flux is the key to a perfectly done job with minimal time and physical costs. It is the flux that is responsible for whether the desired metal will be soldered, what the strength of the joint will be, how difficult it will be to go through the whole process. The whole task of the flux is to destroy the oxide film of the soldered metal.
Flux "Soldering acid", which refers to acidic active fluxes, must not be used when soldering electronic parts. Due to its aggressiveness, such a flux can cause corrosion. But it is precisely this property that will allow you to perfectly connect metal parts. Thus, the more chemically resistant the metal, the flux used should be more active. But we must not forget that what remains of the active fluxes must be removed after the process is completed.
For soldering steel structures, an aqueous solution of zinc chloride and soldering acids produced on this basis are considered effective fluxes. At the moment, manufacturers have introduced a wide range of strong fluxes that can also be used in soldering.
When working with stainless steel, unlike low-alloy and carbon steel, you need to use more active fluxes that will destroy the layer of persistent oxides covering the surface of stainless steel.
When figuring out how to solder iron products with a soldering iron, it is obvious that an electric soldering iron will not be suitable for these purposes, since it will not be able to complete the task assigned to it. It is necessary to solder cast iron only by high-temperature soldering.
To perform high-quality work with stainless steel, it is necessary apply phosphoric acid(F-38). Since it best overcomes the oxide resistant film covering this material.
Galvanized iron will easily allow you to solder flux, which includes zinc chloride, ethyl alcohol, ammonium chloride, rosin (LK-2).
 Not all devices and materials are necessary when carrying out soldering work. But all of them simplify and make working with a soldering iron more convenient and comfortable.
A soldering tool stand is needed not only for convenience, but also for safety. To ensure that the heated tip of the device does not touch foreign objects that can be damaged by such contact.
There are three options obtaining such a necessary device:
- The stand is sold in a set with a soldering tool.
- Purchased.
- Produced independently from a sheet of thin tin.
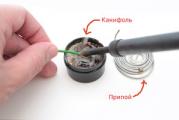
To remove excess solder, there is a special braid, which is made from fluxed thin copper wires. Its unwound end is applied to the solder, and then pressed on top with a soldering iron. Subsequently, all excess solder with the help of capillary forces, it is possible to collect in it, as in a blotter. The used tip of the braid, which is already saturated with solder, is cut off and discarded.
When soldering, it will be very appropriate to have a fixture that called "third hand". This device, with its clamps, solves the problem with a catastrophic lack of hands during the soldering process, where a soldering iron is held in one hand and solder in the other. In addition, this device can also be equipped with a magnifying glass, which will help you better see soldered small items or thin wire.
And of course, you can not do without soldering procedures without tweezers, clamps, pliers. After all, the parts can get very hot, and it will be impossible to hold them with your hands.
Soldering iron technique
There are several ways to work with a soldering iron:
- Delivery of solder from the tip of the tool directly to the desired parts.
- Supply of solder directly to the area of the soldered part.
But before you start soldering, you need to make preparatory manipulations with details. Preparation consists in fixing the parts, heating the soldering iron and wetting the soldering place with flux.
If soldering in the first way, a small amount of solder is melted on the soldering iron and presses its tip to the necessary places on the soldered parts. The steady movement of the tip of the soldering iron along the intended seam contributes to the ideal distribution of solder over the soldered surface.
In the second version of soldering, you must first heat the necessary parts with a soldering iron to the required soldering temperature, and then the solder is fed end-to-end between the necessary parts or on the surface to be soldered. The solder, when melted, will fill the gap between the parts, which will provide the desired result.
Wire tinning
 Tinning is the process of coating the top layer of metal with solder. Such an operation is carried out both as a preparatory operation before soldering, and as an independent operation.
The most common direction where tinning is applied is tinned ends of electrical wires. How to properly solder wires with a soldering iron and produce tinning to get the desired effect, we will consider in detail.
Depending on what the wires are made of and their condition in which they are at the time of work, the processing to which they must be subjected also differs.
Solid copper wire is best suited for tinning. The new wire is not protected by oxides, so it does not need to be manipulated to clean it. The process consists in applying flux to the tip of the wire, solder is applied to the hot end of the soldering iron, and the soldering iron is carried along the wire, while trying to turn the wire.
In some cases, when the conductor does not intend to tinker, a simple tablet can help. This can happen if the wire is varnished or enameled. In such a case, it is necessary an aspirin tablet place on the planks and firmly pressing the conductor to its surface, heat up with a soldering iron for a few seconds. With such actions, the tablet melts, which causes the destruction of the varnish. After that, you can carry out tinning of the wire without problems.
Fumes from a melted aspirin are harmful to health, so you can use a special flux that removes varnish from the surface of the wires.
If the wires are old, then they are usually covered with oxides, which will interfere with the tinning process. You can solve the problem with the help of the already mentioned aspirin. To do this, you need to unwind the conductor, put it on a tablet and heat it with a soldering iron for several seconds, moving the conductor from side to side.
 To carry out tinning of aluminum wire, you need to purchase a special flux, for example, Flux for Aluminum Soldering is ideal. It can also be used when soldering metals with a resistant oxide film. The only thing that should not be forgotten when using such a flux is the cleaning of the soldered surface from its remnants. If this is not done, it may appear corrosion at the soldering point.
To remove the remaining solder formed during tinning, you can place the wire vertically and press a hot soldering iron to the place of excess. All excess will drain to the soldering iron from the wire.
Using all the knowledge and the right materials, you can achieve perfectly done work when using a soldering iron.
My relationship with radio and microelectronics can be described by a wonderful anecdote about Leo Tolstoy, who loved to play the balalaika, but did not know how. Sometimes he writes the next chapter of War and Peace, and he himself thinks "trendy brandy trendy brandy ...". After courses in electrical engineering and microelectronics at my beloved Moscow Aviation Institute, plus my brother’s endless explanations that I forget almost immediately, in principle, I manage to assemble simple circuits and even come up with my own, good now, if you don’t feel like messing around with analog signals, amplifications, pickups, etc. you can find a ready-made micro-assembly and stay in the more or less understandable world of digital microelectronics.
To business. Today we will talk about soldering. I know that many beginners who want to play with microcontrollers are deterred by this. But first, you can use
So, we are almost there. I write everything in such detail, because, honestly, it was a breakthrough for me. As I accidentally discovered, all that is needed for soldering simple components is a soldering iron, the most common one with an awl-shaped tip:
And solder with flux inside:

It's all in the process. You need to do it like this:
- The part is inserted into the board and must be secured (you will not have a second hand to hold).
- A soldering iron is taken in one hand, a wire of solder is taken in the other (it is convenient if it is in a special dispenser, as in the picture).
- Solder on a soldering iron to take NO NEED.
- Touch the tip of the soldering iron to the place of soldering and heat it. Usually, it's 3-4 seconds.
- Then, without removing the soldering iron, with the other hand, touch the tip of the solder wire with the flux to the place of soldering. In reality, in this place all three parts come into contact at once: the soldering element and its hole on the board, the soldering iron and the solder. After a second, “pshshshshsh” occurs, the tip of the solder wire melts (and a little flux flows out of it) and the required amount of flux goes to the place of soldering. After a second, you can remove the soldering iron with solder and blow.

It is clear that the waiting time in each phase requires at least a minimum of practice, but no more. I am sure that any beginner using this technique will solder Maximite himself in an hour.
Let me remind you the main signs of good soldering:
- A lot of solder does not mean high-quality contact. A drop of solder at the point of contact should cover it from all sides, without potholes, but not be an overly huge bulb.
- The color of the solder should be closer to shiny, and not to matte.
- If the board is double-sided, and the holes are non-metallized, it is necessary to solder using the specified technology on both sides.
Planar elements (of course, not the smallest ones) are even easier to solder in some way, although for home-made devices you will already have to etch the board, since there will not be much convenience from using planar elements on a prototyping board.
So, a small, almost theoretical bonus about soldering planar elements. These can be microcircuits, transistors, resistors, capacitances, etc. I repeat, at home there are objective restrictions on the size of elements that can be soldered with a conventional soldering iron. Below I will give a list of what I personally soldered with a regular 220V soldering iron.
For soldering a planar element, it will no longer be possible to use solder on the go, since it can “come off” too much, “bay” several legs at once. Therefore, it is necessary to first in some way tin the patches where it is planned to put the component. Here, alas, you can’t do without a liquid flux (at least I didn’t succeed).
Drip a little liquid flux on the patches (or patches), take quite a bit of solder on the soldering iron (it is possible without flux). Very little solder is generally needed for planar elements. Then lightly touch the end of the soldering iron to each patch. There should be some solder on it. More than necessary, each patch "will not take."
Take the element with tweezers. Firstly, it is more convenient, and secondly, the tweezers will remove heat, which is very important for planar elements. Attach the element to the place of soldering, holding it with tweezers. If this is a microcircuit, then you need to hold on to the leg that you are soldering. For microcircuits, heat dissipation is especially important, so two tweezers can be used. You hold the part with one, and attach the second to the soldered leg (there are tweezers with a clip that you don’t have to hold with your hands). With the second hand, you again apply a drop of liquid flux to the soldering place (maybe it will get a little on the microcircuit), with the same hand you take the soldering iron and touch the soldering place for a second. Since the solder and flux are already there, the soldered leg will “immerse” in the solder applied at the tinning stage. The procedure is then repeated for all legs. If necessary, you can dig in liquid flux.

When you buy liquid flux, buy liquid for washing boards. Alas, with liquid flux it is better to wash the board after soldering.
I must say right away that I have never been a professional, and not even an advanced amateur in soldering. I did all this with a regular soldering iron. The pros have their own methods and equipment.
Of course, soldering a planar element requires much more skill. But still quite realistic at home. And if you do not solder microcircuits, but only the simplest elements, then everything is still simplified. Microcircuits can be bought already soldered into pads or in the form of ready-made assemblies.
Here are pictures of what I personally successfully soldered after a little practice.
This is the simplest type of hull. These can be put in pads that are the same in complexity of soldering. These are simply soldered according to the first instruction.


The next two are more difficult. Here it is already necessary to solder according to the second instruction with a neat heat sink and liquid flux.


Elementary planar components, such as the resistors below, are quite easy to solder:

But there is, of course, a limit. This kindness is already beyond my abilities.


In the end, a couple of cheap but very useful things worth buying in addition to a soldering iron, solder, tweezers and wire cutters: 
Successes in soldering! The smell of rosin is awesome!
Let's say you want to solder aluminum. Not everyone knows that rosin takes only copper and its alloys. Others need to be soldered using special fluxes, acids, solders. Even steel lends itself to this science, if approached wisely. Consider how to properly solder with a soldering iron.
Process characteristics
Inside the soldering iron there is a heating element of a certain power, placed in an insulating jacket made of ceramics or other heat-resistant material. This is necessary so that all the heat goes inside where the sting is located. The main difference between soldering irons is power and shape. Depending on this, the wizard decides what specifically needs to be used.
Often used as a tool in electronics. In the case under consideration, it is important not to exceed the dissipation power of relatively fragile resistors, microcircuits, and capacitors. If this happens, the work is redone. With the difference that you have to buy the damaged item in the store. Therefore, it is important to learn how to solder correctly.
It is difficult to say how much power is required in a particular case. Radio amateurs are guided by size.
Soldering iron power
First, the power of the soldering iron is estimated. It is clear that it is simply dangerous to climb into the motherboard with a 100 W unit. It is wiser to purchase a soldering iron for 20 or 50 watts. Please note that not all soldering irons are powered by 220 V. There are many examples of non-compliance with the rule. The manufacturer is guided by a simple logic: a low-power soldering iron requires a twisted helix that introduces large losses at a frequency of 50 Hz. It is more logical to switch to direct current. In such a case, the inductance no longer plays a big role. If you connect a low-power DC soldering iron (on the far right in the photo) to a 220 V AC mains, the product will burn. But the Chinese produce small soldering irons (second from left). The one shown in the photo shows a power of 40 watts and is powered by a standard outlet. Finally, by default, 100 W soldering irons were produced in the USSR (far left). How to determine the power and supply voltage? This is the main difficulty: often the soldering iron does not carry distinguishable designations. If you take Chinese, a red and white sticker is glued on it (see photo) with information, and for a device with a wooden handle, the power is indicated on the plug. The protective cover of the 100-watt soldering iron is marked accordingly. GOST is indicated there, information can be gleaned from the documentation. A powerful 100 W soldering iron allows you to work with rough and large parts, indispensable for hard solders.
Sting section
Often the size of the tip (metal rod for soldering) plays a role. For example, a 100-watt soldering iron has a copper stick of solid thickness. If you need to solder something thinner, the tip is changed. At the soldering iron in question, it is simply pulled out, and where to buy a spare is the second question. For example, stings are sold in special shops for radio amateurs and can cost a decent amount. A Chinese 40 W soldering iron with an excellent tip cost 40 rubles (FixPrice), and a tip of this kind can cost 300 rubles separately. The mounting system is different. For example, in a DC soldering iron, it is unscrewed, while in a Chinese one it is held on by screws (like a device with a wooden handle). The material may vary. The bulky tips of 100-watt soldering irons are usually copper, while the modest and miniature ones are made from an alloy of non-ferrous and ferrous metals. But both options allow you to work with all solders that can be melted.
Before work, the soldering iron tip is cleaned from waste materials and oxide film with a file or file. It is clear that this is not the only way. For example, for such purposes it is allowed to use dissimilar fluxes. It's time for readers to find out how the part is prepared for soldering.
How the surfaces of the part and the tip are prepared for the soldering process using fluxes
The surface of any metal (with rare exceptions) is covered with an oxide film. As a result, the solder simply does not fit. A group of substances whose purpose is to remove the oxide film from the surface is called fluxes. They are solid and liquid, and are also sold mixed with solder in the form of pastes. The first category includes rosin and a number of other substances. Liquid fluxes are often acids, salt solutions. Alcohol and other liquids become the basis.
It is important to understand that a special composition is used for various cases. The only difference is the price, on which you need to try to save. Under the action of high temperatures and rosin, the oxide layer is removed from the surface of the copper wire and the varnish insulation, if any, is dissolved (this is typical for transformer windings). At the same time, the flux improves the wettability of the surface. Due to this, the solder spreads easily, and then sticks and hardens. Elastic, resilient and durable contact is formed. Therefore, soldering is used not only by radio amateurs, but also by representatives of other professions. Including car repairs.
For various types of surface, a specific flux is sold. For example, steel is etched with hydrochloric acid, zinc chloride is often used. It should be understood that after the soldering process, the surface is cleaned, otherwise its destruction will continue. They get rid of flux residues with brushes, emery, often washed with a weak solution (5%) of soda, the place of exposure to acids, and then with hot and cold water.
Pay attention to wettability: in order to braze aluminum, it is not enough to clean off the top layer with a needle file. This almost does not give a result, since the solder does not spread over the surface. Wetting is poor. After treatment with acid, the alignment of forces changes dramatically. As for steel, special acids have been created for it (see photo). Cast iron is also soldered, cutting the edges for solder. First, the surface is treated with flux, then it is tinned. Then gradually the entire volume is filled flush with the surrounding surface.

Ammonia solution is often confused with ammonia. The first is ammonium hydroxide (10% solution), and the second is chloride. Both wires cannot be soldered in their pure form, but they are used for the manufacture of various fluxes. For example, dilution of ammonia with water allows you to get hydrochloric acid. Here, amateurs already invent their own recipes, many of which can be read in the public domain. And it is also advised to solder aluminum with a soldering iron using an aspirin tablet.
What is solder, types of solders
Solder is a mixture of metals. The main task: obtaining maximum strength and electrical conductivity at minimum cost. More often you have to work with tin-lead solders, but zinc is also used for soldering aluminum. The melting point index of the latter is higher, and this is one of the criteria by which it is customary to distinguish:
- Especially fusible - an indicator of a melting point below 145 degrees Celsius.
- Fusible - an indicator of a melting point above 145 degrees Celsius, but below 450.
- Medium-melting - an indicator of a melting point above 450 degrees Celsius, but below 1100.
- High-melting - an indicator of a melting point above 1100 degrees Celsius, but below 1850.
- Refractory solders have a melting point above 1850 degrees Celsius.
You have to use the burner already in the upper part of the third group: the melting point is high so that the soldering iron takes it. We add that the electrical conductivity of tin is higher than that of lead, for this reason compositions with a high metal content are more expensive for soldiers. But this is not the only reason. When tinning pans, it is important to maintain the conditions of harmlessness to humans. It is clear that lead is out of the question in this case.

The percentage of more expensive metals usually appears in the brand name. For example, in POS (tin-lead solder) it is possible 10, 60 or 90%. The composition often includes antimony. Its percentage is usually after the dash, for example, POSSu 40-0.5. Antimony is added, like many other impurities, to improve the quality of the solder. In particular, it reduces the oxidation of the melt, which leads to a high-quality appearance, and there is no need to protect the joint with varnish. Antimony increases the heat resistance of the compound to temperatures above 100 degrees Celsius.
In Europe, a ban on lead-containing solders is now being introduced. They are replaced by silver ones, although the melting point increases. And the cost goes up, of course. But do not think that a high price means indispensable quality. Tin is expensive, but Scott's expedition to the South Pole died due to the tin plague in 1912. Already at a temperature of four degrees Celsius, negative changes are possible, but with a decrease in the process, the process is aggravated. Imagine what happens to pure tin in the cold.
No one can fully explain the process of the plague. It is believed that the tin must be infected, and then the seams of the solder crumble. Scott's expedition took barrels of fuel soldered with the purest metal. Studies have been carried out, and it has been found that the addition of a small percentage of lead blocks the development of the plague. Even POS 90 is not afraid of frost, but it is expensive, and POS 40 and lower are often used in technology, despite its relatively low electrical conductivity.
In addition to those listed, copper solders are used in places. Their melting point is relatively high, so a torch must be used. In such a case, a flux is usually poured onto the surface (less commonly used liquid) for stripping. Then it all depends on the nature of the task. For example, to solder the cable tip, the first one is clamped in a vise with the flask up, and crumbs of solder are poured inside. All this is heated by a burner. Then the cable is inserted inside, and the outer insulation is melted. It is recommended to cool the place forcibly, for example, by blowing.
soldering process

Before starting work, we prepare a soldering iron. First, the sting is cleaned. Dense soot is removed by chipping with a sharp tool. The photo shows a soldering iron, part of the tip is cleaned with a needle file. It can be seen that from long use the surface has become uneven, bumpy. This interferes with the soldering process.
Weak soot is removed after warming up. For this, the same acids and rosin are used. The task is to expose the sting. Often, under the action of fluxes, a thick crust also falls off, which is difficult to grind off.
The insulation of electrical wires is stripped to the desired distance. Then the core is processed with a molten rosin or acid. This is done with a soldering iron and in many cases a good exhaust will be required. For example, vapors of formic acid are often used in industry, but this substance is very dangerous for humans. Before using a chemical to solder copper electrical wires, carefully search the Internet for what is said about the safety of such actions. From the nature of the influence of formic acid it becomes creepy.
If you solder the electrical wires correctly, then already in the process of removing the oxide film, you can see how the solder creeps over the surface. This can be seen especially clearly on the reverse side of printed circuit boards. The tracks are supposed to be covered with a thin layer of solder. Those who think that this is a long time to do are worrying in vain. Literally in one fell swoop, you need to bypass the installation with smoking rosin, and then pick up solder, and it will spread over the surface. A typical power supply takes a matter of minutes. Etching the board in blue vitriol takes longer.
We believe that readers have already realized that it is possible to solder aluminum with tin only after removing the oxide film.
The ability to solder in modern life, saturated with electrical appliances and electronics, is as necessary as the ability to use a screwdriver. There are many methods for soldering metals, but first of all you need to know how to properly solder with a soldering iron. Such a seemingly simple action has a lot of subtleties and nuances - starting with the choice of a tool and ending with security measures when working with it.
General issues
It is metals that are used, they tend to spread over the surface if they are in molten form. This is facilitated by the forces of gravity and moderate tension. This property allows you to connect multiple parts. They are covered with a layer of solder, fixing the elements in a certain position.
It would seem that everything is elementary: he melted the metal and covered the place of fastening of the parts with it. In practice, a more complicated situation is observed, because it is important that the part is both durable and conductive by electric current. Ideally, the layer should be thin, but with maximum coverage.
To better ref To proceed with this operation, you need to consider the following points:
Knowing how to do it right is the key to success. Everything is not so difficult, because there are many universal options with which you can easily solve most of the actual tasks when soldering. All the necessary information is contained on the labels, so before buying any brand, carefully read what is written there.
Typically, fluxes are needed for etching and removing the oxide film. In addition, their application is an excellent way to protect against corrosion. Without them, it is difficult to imagine a full-fledged preparation for soldering, because if the parts are not tinned, then high-quality articulation cannot be achieved. As a rule, these substances are mixtures of salts, alkalis and acids.
There are two types of fluxes:

 The choice is made on the basis of specific goals to be achieved. It is better that both varieties are present in the arsenal.
Fixing is done using solders. As a rule, lead-tin marks (POS) are used. After marking, there is always a number that indicates the concentration of tin. The more impressive this indicator, the higher the resistance to mechanical stress and electrical conductivity. The melting point is lower. The lead in the compound is needed for curing. Without it, tin will not be able to maintain uniformity.
On sale there are special varieties of solders in which there is no lead (BP). It is replaced by indium or zinc. A big plus of such compounds is the absence of toxicity. The melting point is higher, but the strength is much more serious.
You can find fusible brands. These are Wood's and Rosé's solders. They spread at a temperature of 90-110 degrees. Such connections are used in the creation and repair of equipment.
The variety of types of work and the conditions in which they are performed has given rise to the emergence of several types soldering equipment.

Choosing a soldering iron tip
 This part of the structure is different in shape and material from which it is made. The most primitive option is an awl-shaped sting. There are many variations: a blade, a cone, a bevel, etc. When choosing a shape, you need to have an idea about the work that will be performed by this sting. It is important to purchase something that will provide the maximum area of \u200b\u200bcontact with the surface.
As a rule, the material is used copper, to which various impurities are added (for example, chromium or nickel). This improves performance. In particular, durability is significantly increased.
An uncoated sting quickly becomes unusable. It has to be cleaned periodically tinker. In order to level this flaw, it is recommended to forge this element and grind it in order to give one form or another.
In various situations, this tool can be used with a number of features that are worth paying attention to. Not only the final quality depends on this, but also the degree of feasibility of the operation as a whole.
Soldering wiring
 The ends are dipped into the flux and after that we pass along them with a sting moistened with the same solution. It is important to shake off excess wires. Do not neglect this if you want to achieve a quality connection and flawless functioning.
When the preliminary stage is over, we twist the wires and warm them up with a small amount of solder. All free space must be filled with the molten mixture.
If stranded conductors are meant, tinning can be dispensed with. The ends are simply wetted and fixed without pre-treatment with a sting. Inside switchboards, this operation is not carried out, since the risk of corrosion is high. In addition, such designs do not belong to the category of detachable.
Electronics repair
 Right approach is achievable only by experience. If you have never done such work, use the help of a specialist who will tell you how to work with a soldering iron in this case, because it is important that someone controls and makes timely edits into the process. But if we are talking about a typical printed microchip, even the one who first picked up the instrument will cope.
Easiest to solder small output elements. We first fix them with some kind of viscous substance in the holes. Firmly press the sting on the back to warm up. Then we introduce solder into the place of soldering (it should not be too much).
If the output element dangles, first we wet it with flux. With this technique, a small drop of tin from the soldering iron is transferred to the leg. The substance flows down, filling the hole.
Large parts
 Cable sleeves, tanks and utensils have a high heat capacity, so the process service and the connections look a little different.
First we achieve complete immobility. This is done using clamps or plasticine (wax). Then point soldering is performed.
Next stage - tinning. It is performed at the fixation points. It is important to approach this process with the utmost care.
Then - the free space is filled with solder. Special compositions are used, which are characterized by infusibility and the ability to maintain tightness over a long period of time.
If you have to make a large seam, the role of a soldering iron can be played by a copper hatchet heated on fire. It's all, what you need for soldering in such cases.
Important Points

Working with a soldering iron is not as easy as it might seem. The development of this skill will significantly expand the range of operations and technician that you can use.
Sometimes the question may arise how you can solder a wire without using a soldering iron, because soldering is the most common way to connect small parts at home. There are situations when an urgent wire connection is required, but the soldering iron, used as a simple and convenient tool, is in a broken state. How, armed with it, to connect metals, almost everyone knows. But how soldering is carried out if there is no electricity at home is another issue, which we will consider below.
Using a homemade stinger
Not everyone at home has such an ordinary tool as a soldering iron, but there are plenty of various breaking devices. Most often, these are phone chargers or headphones from which the plug has broken off. Of course, if necessary and possible, you can buy new accessories, or you can breathe new life into old ones. You can replace the soldering iron using ordinary materials at hand. In a word, a simple soldering iron tip is made, for heating which any source of fire is suitable.

The materials at hand are as follows: a single-core piece of copper wire (diameter - 0.5 cm), as well as a small piece of fabric that is resistant to high temperatures. You can use the wire as a sting, one side of it must be carefully sharpened at an angle of about 45 degrees. This will serve as a soldering tool in the future. As for the other end of the cable used, it is well thermally insulated so that it can be safely handled. Fiberglass or, at worst, ordinary jeans are suitable as an insulator. It is enough to cut a long piece of fabric and wind it around the wire. To fix the fabric, use a thread or glue.
Now let's move on to the most important thing: how to carry out soldering with such a homemade sting. First of all, you need a source of fire. For example, they will serve as a gas stove. You should take the sting and heat it thoroughly. Further, when it heats up, they touch rosin and solder, as a result of which the end of the sting will be tinned. The tool, albeit a handy one, in this state, is suitable for soldering.
For example, what to do if the charger for the phone is broken. First of all, you need to carefully strip the ends of the wire using a knife. Next, a heated sting is used, with which the ends of the copper wire are tinned. Soldering is used to connect the break point.
Important! When soldering, make sure that the wire being processed is thoroughly stripped. To remove oxides from the surface, an ordinary knife is most often used, resulting in high-quality tinning.
Using a homemade tip that replaces a soldering iron, you just need to lightly touch the damaged wire, as a result of which it will normally and quickly tin.
Foil soldering
Using this method, soldering is completed in 5 minutes. The foil in this case is used as solder, which is rolled into a thin strip. This form is considered very convenient, since it will not be smeared over the area and leak at a higher dosage, which is physically impossible.

The type, location and size of contacts can be any, with this method there are no specific restrictions. Foil soldering is useful in a variety of situations, from soldering a wire to a board to connecting the pins of two twisted wires.
In order to prepare the contacts, you will need to remove the insulation from them and clean them of its residues. Next, the ends of the wires are connected by twisting, the required amount of foil is cut off, the adhesive tape is removed, and the wire is wrapped around. Further, uniform heating is carried out, for which a candle or an ordinary lighter is suitable.
How to solder a garland with improvised means
In the case of a garland, first of all, you will need to find the place where the wire was disconnected. The reason for this may be:
- Often the contacts break in the control box, where thin wiring does not provide enough contact area;
- Also, a rush can be along the entire length of the garland;
- If the lamps are connected in parallel, then if one burns out, the entire circuit will open.
Note! Before starting work, you must disconnect the garland from the network.
As a rule, contacts that have moved away are easy to find with the naked eye. In other cases, a special tester may be needed: each half is measured, after which the circle of searches is gradually narrowed until a non-working element is found.
Having found the place of the gap, you can begin the soldering procedure. It should be noted that in this situation, it is the solderless method that is most relevant, which is explained by the small diameter of the wire. Paste and heat shrink tubing will be effective here. The schema looks like this:
- The wire is cut off at the break point;
- It is being cleaned up;
- The tube is put on in advance and shifted to the side (until soldering is completed);
- Twisting is done and paste is applied (no need to touch the edges of the insulation);
- The solder is thoroughly heated with a candle or a lighter;
- The cooled place is covered with an insulating tube, which must also be warmed up.
In the same way, you can solder broken headphones.
The soldering iron is known as a handy and simple tool, but there are situations when it fails. There is no need to worry, since soldering can be done with the help of improvised means. It is enough to know some of the nuances.
Video