Sword fighting technique training. Sword fencing textbook. general physical preparation
The fact that childbirth should be anesthetized is less argued today than before. The evidence “for” is obvious: from long torment, a woman loses control over herself and ceases to follow the advice of obstetricians, risking harming herself and the child. But birth control method– with or without drugs – is still a topic of heated debate.
Supporters of natural processes are convinced that if a woman is prepared and properly tuned in for childbirth, then she can handle it herself - there are plenty of techniques, you just need to remember and apply them. Long before the advent of modern medicines, a woman in labor would go to a quiet place and calmly do what was necessary. A few centuries ago, midwives with age-old wisdom appeared who helped in word and deed. A little more than two centuries ago, obstetrics began to develop rapidly, and previous practices were forgotten.
Non-pharmacological anesthesia of childbirth: breathing
This is one of the most ancient and popular techniques in our time. Proper, rational breathing gives the mother's body required amount oxygen, which helps to relieve muscle clamps and allows you to control yourself. To obtain the necessary skills, it is enough to take a course of preparation for childbirth. If you could not do this in advance, listen to the midwife - she will tell you how to breathe at different stages.
"Respiratory" pain relief helps women who are capable of self-control and concentration. Otherwise, with increased pain, the expectant mother, unable to cope with her emotions, will “lose” all her skills.
Ways of pain relief during childbirth: massage
There are special points, massaging which at the time of the contraction, you can reduce pain. Some of them are available for independent manipulation, the rest are more difficult to get to - you will need the help of a partner. Of course, pain relief with acupressure will not be absolute, but relief will be felt. The technique is also taught in courses to prepare for childbirth. If the expectant mother attends classes alone, then knowledge of anesthetic points will not be useful to her - it is not enough to influence only those located in the access zone.
Requires a "full set". for charging! If during contractions a woman gets up and actively moves, the pain subsides. This is easy to explain: when muscles work, hormones of joy are released - endorphins, which are natural painkillers. Physical activity improves blood flow in the uterine arteries, which favorably affects the condition of the child. Walking and other distracting activities during childbirth may not be allowed for everyone.
If the pregnancy has complications, you will have to give up vigorous activity.
Methods of pain relief during childbirth: water
Water helps to relax and relieve tension in many situations, and childbirth is no exception. Even an ordinary shower gives strength, raising the pain threshold. Some maternity hospitals and perinatal centers are equipped with whirlpool tubs. If the fetal bladder burst before the opening of the cervix, water procedures are excluded, since the risk of infection entering the birth canal increases.
Physiotherapy method of labor pain relief
The physiotherapeutic method of pain relief is called electroanalgesia. Weak electrical discharges transmitted through the skin block the passage of pain impulses. Four electrodes are attached to the lower back. Holding the mode switch in her hands, the woman controls the strength of the impulse. The pain goes away only for a while, allowing the expectant mother to take a break from contractions. He also has contraindications, for example, varicose veins or cardiovascular diseases.
Physiotherapy method of pain relief: nitrogen
The history of medical anesthesia for childbirth began with chloroform, then it was replaced by “laughing gas” - nitric oxide. It is still relevant, because when mixed with oxygen, it helps to relax a little. Opiate (narcotic) analgesics, including morphine, were also tried, but not for long, noticing that the baby was also immersed in a kind of sleep along with the mother. Substances penetrated the placenta, and the baby was born lethargic, worse adapted to the surrounding changes. Modern analgesics and tranquilizers work easily, but they "reach" the baby. No visible harm, but still ...
Epidural anesthesia for childbirth
From painful sensations for the entire period of contractions, only epidural analgesia relieves. The method also has “side” advantages, for example, it relieves spasm of the cervix - a common complication in which the opening slows down, or even stops altogether. In the running version, the situation becomes the cause caesarean section. Epidural analgesia significantly reduces pressure. If a woman initially has it increased, then this disadvantage turns into dignity. Other options require medical intervention. The second disadvantage of this technique is its ability to slow down labor activity to one degree or another.
If the epidural slows down the course of events, stimulants (oxytocin) cannot be dispensed with.
There are also less significant drawbacks that overshadow the meeting with the baby - back pain at the injection site and headache, fever, chills, trembling of large muscles, allergies.

Anesthesia during childbirth
If the doctor says that, for medical reasons, drug analgesia is necessary, you should not refuse it contrary to common sense. To remove doubts, it is better to understand the essence of each method and reasonably assess your capabilities. Information cannot be obtained from dubious sources, including the Internet, contact a gynecologist, or even better, a practicing obstetrician and anesthesiologist.
You may be interested in the articles on the site
Maria Sokolova
Reading time: 12 minutes
A A
A woman who is about to give birth probably raises questions for herself - “Will I withstand the pain that lies ahead? Maybe you should use anesthesia during childbirth? Will it be harmful to the child? The decision on anesthesia is made by the doctor. The doctor's final verdict depends on the patient's pain threshold. future mother, concomitant causes in each specific case, for example, the position and size of the fetus, the existence of previous births.
Of course, if you decide to give birth in paid clinic and prescribe a clause on anesthesia in the contract, then any whim will be fulfilled for your money.
Anesthesia by inhalation method - pros and cons
The inhalation (mask) method involves the loss of pain sensitivity by inhaling a gaseous narcotic drug - nitrous oxide or inhalation anesthetics - methoxyflurane, halothane and pentran through a respirator-like mask.
This anesthetic is used in the first stage of labor when the cervix opened 4-5 cm. This method is also called autoanalgesia, i.e. “self-anaesthesia”: a woman who feels the approach of contractions takes a mask herself and inhales the agent contained there. Thus, she herself controls the frequency of anesthesia.

Pros:
- The drug quickly leaves the body;
- Produces a fast analgesic effect;
- Has minimal effect on the baby
Minuses:
- There is side effects which are manifested by dizziness, nausea and vomiting
Advantages and disadvantages of intravenous anesthesia in ER
Intravenous or intramuscular (parenteral) anesthesia is used to reduce pain sensitivity during childbirth and give the woman the opportunity to slightly relax between contractions . The anesthesiologist injects one of the narcotic analgesics or its combination with the addition of a sedative, for example, diazepam.
Duration of anesthesia may vary 10 to 70 minutes and depends on the type and amount of the administered drug.

Advantages:
- Negative effects from anesthetics are short-lived;
Flaws:
- Drugs that enter the baby's bloodstream have a suppressive effect on nervous system the child, and also affects his respiratory processes after childbirth;
- The anesthetics used can cause serious complications in the newborn.
When is local anesthesia needed?
When using the method local anesthesia do an injection of an anesthetic in the place where you want to dull the pain , thereby causing inhibition of nerve function and dulling of cell sensitivity. If it is necessary to anesthetize a small area of the body, then anesthesia is called local, if it is larger, then regional.

For local anesthesia for childbirth the injection is injected into the perineum or even deeper. In this case, the sensitivity of only a certain area of \u200b\u200bthe skin is lost. Most often, this type of anesthesia in natural childbirth is used when soft tissues are sutured.
Exist types of regional anesthesia used during childbirth:
- epidural;
- Spinal.
Pros:
- The risk of developing increased blood pressure(hypertension) in parturients suffering from high blood pressure, minimal;
- Minimal risk of mental disorders in the newborn.
Minuses:
- There is a possibility of a sharp drop in the blood pressure of the woman in labor, up to loss of consciousness;
- Complications of a neurological nature: sensitivity in the lower extremities is disturbed, there are headaches and pain in the spine;
- Inflammatory processes are possible;
- Side effects in the form of chills, skin itching, shortness of breath.

You can not use regional anesthesia during childbirth if:
- There are infections at the intended puncture site;
- The presence of diseases of the central nervous system in a woman in labor;
- low blood pressure;
- Allergic reactions to the drugs used;
- Orthopedic disorders, when it is impossible to reach the intervertebral space;
- Scars on the uterus;
- Violation of blood clotting.
Drugs - both for epidural and spinal anesthesia - injected into the lower back, near the nerve endings . This makes it possible to block pain a large area of the body, while the woman in labor is awake.
The price of this anesthesia during childbirth is quite high: only at least 50 c.u. go to consumables.
When is epidural anesthesia indicated in childbirth?
Epidural anesthesia means drug injection into the spinal canal , located outside the bag that surrounds the spinal cord, i.e. between the vertebral discs.
A thin needle, which is removed after the completion of the birth process, injects the required amount of the drug, and if necessary, an additional dose.

Apply if the woman in labor has:
- kidney disease;
- Diseases of the heart, lungs;
- Myopia;
- late toxicosis.
- With premature birth and improper location of the fetus.
Pros:
- Anesthesia can be extended as needed, thanks to the catheter in the spine, through which the anesthetic is delivered at the right time;
- Less likely than with spinal anesthesia to drop blood pressure.
Minuses:
- Many side effects;
- Delayed action of the drug. The anesthetic begins to act 15-20 minutes after its administration.
Advantages and disadvantages of spinal anesthesia
With spinal anesthesia the drug is injected into the meninges - in the middle of its hard part, located near the spine. Usually used for planned or emergency caesarean section.

Advantages:
- Acts faster than epidural (3-5 minutes after injection);
- The process itself is simpler and faster compared to the epidural method;
- Costs less drug;
- Does not have a depressing effect on the baby.
Flaws:
- More often than epidural, causes headaches and low blood pressure;
- It provides pain relief during childbirth for a certain time (1-2 hours).
Indications for general anesthesia for EP
When it is impossible or undesirable to carry out regional block then general anesthesia is applied. She is carried out in urgent cases, for example - with a deterioration in the condition of the child or with maternal bleeding.
Anesthesia during childbirth causes a rapid loss of consciousness and is carried out without additional preparations.

Flaws:
When it is not known whether there is liquid or food in the stomach of the woman in labor, then there is a possibility of developing unconscious aspiration
- ingestion of contents from the stomach into the lungs, which leads to a violation of the lung tissue and its inflammation.
This series of instructions is based on a three-year study of late medieval and early renaissance fencing manuscripts.
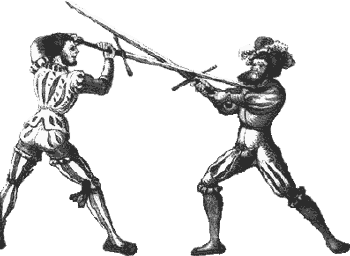
Divide the body into quadrants with an intersection at waist level. This produces four main targets: top, bottom, left, and right. The principle of four guides is applied in all areas. There are four main defenses, four main attacks, and four main counterattacks (because there are four targets).
In the figure we see an image of the whole body, divided into targets. Each part is a quadrant: High, Low, Right and Left. The circle around the body is the circle of protection that must not be overcome. The quadrants can be reached by two main methods: thrust and cut.
Footwork
1: Substep and pass
Side step - movement of the foot that is closest to the direction of movement. For example: if you are moving forward, move your front leg first, if you are moving backward, move your back leg first.
A passing step is to pass one foot past the other, thus changing the front foot.
2: Snatch and lunge
All textbooks say the same thing: when attacking from the left, step with the left foot, and when attacking with the right, step with the right foot. At first glance, this is too simple. This simple rule applies to all stances, no matter which foot is in front. There are two points in this tutorial:
1. Avoid crossing your counter at all costs
2. Never turn your back on your opponent
Let's repeat the rule in a more simplified way: when stepping to the left, step with your left foot, it doesn't matter if it is in front or not. When stepping to the right, step with your right foot, whether it is in front or not.
If your back foot passes your front foot in a passing step, you are in a dash.
If you thrust forward with your front foot, you are lunging.
Exists four main racks: Plow, Ox, Fool and Roof
The plow is often confused with the middle tine (see below). This is the basic en-garde position with either foot in front. The hand at the guard is slightly to the side of the leading knee, the blade is directed straight forward, the point is at the level of the opponent's chin. The brush on the pommel is slightly to the side and in front of the leading hip. As with other swords, the "wall" must be represented from the outside. The sword continues this wall.
The plow can also be turned by holding the sword in front of an extended thigh. This is a closed rack. It allows you to get close to the enemy while maintaining blade control.
Liberi Window or Zuter's Bull. The bull is also known as the two-horned stance. In the Right Ox, the hand at the guard is raised to the level of the ear on the right (for a right-hander). The brush is on the pommel at the back, the wrists are crossed. Left foot forward. The tip is ahead and threatens the top level of the opponent.
In the Left bull, the stance is reversed, and the grip is free. See also Maier, p. 6
Fool is the front loose stance. In this position, the front arm is extended forward in a free grip. The blade is held forward and slightly down. Either foot forward.
The roof is a high stance, a point above the head. It is the only basic stance in which the point of the blade is not pointed at the opponent, and is thus the only stance not used in the wall method. She, like the bull, is a left-handed stance and starts all shoulder strikes well, as well as the zwerchhau or breaking attack.

First principle of attack: Injection/Point
Stab is the principle following the Wrathful Edge, or Zornort. The thrust is the first principle of attack. Direct hit.
There are four principles of attack:
* Vertical,
* Diagonal,
* Horizontal
* Direct, which underlies the four principles of attack.
Wrathful Blade is the first lead attack. All the rest are chopping blows (from above, below, angry and transverse), which are considered in part 2 of the review.
Basic thrusts must be practiced from all three basic stances (except the roof).
* injections can be with a simple step - a forward throw from the leading leg - a lunge.
* injections can also be performed with a passing step - passing forward from the back leg - a throw.
Practice until you can hit a target the size of a buckler or a hand in a gauntlet.

Fiore dei Liberi (1410)
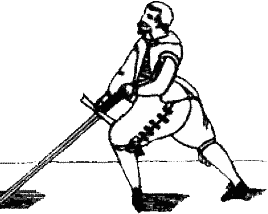
Long point: From the plow or closed stance, extend the arms and point.
Langer Ort - long point. Initiate any thrust from the Plow by raising the arms into a long point, where "point" is understood as the act of aiming. You must aim at your target in order to hit them with a thrust.
Hans Talhoffer (1467)
Throw from the Plow: long point and step forward.
Hans Talhoffer (1467)
A thrust from a closed Bull, or a closed point down and forward, is called a hinged blow. The arms will spin out as they stretch. This attack is most effective on a passing thrust or throw (see Talhoffer, sheet 2)
Zornort - Wrathful Edge
An angry point is an injection into the upper level from a free grip (see talhoffer, sheet 3)
Undercuts
* A cutting thrust is any thrust that was intended to be a cut with any blade, but ended with a thrust with the point.
* An undercutting flick is dribbling across an opponent while quickly flicking the blade.
Undercuts can start with both thrusts and cuts, and can be used when returning from an over-lunge when the blade is close enough to make contact. Undercuts - a way to strike either during a thrust or during a blade withdrawal.
Hans Talhoffer (1467)
Displacement of the angry tip. Place the point/blade on the side using offset (Talhoffer, sheet 3)
The simplest defenses are blocks that take the threatening tip out of the line. They are also known as displacement (Absetzen). Done correctly, they open up the possibility of riposte.
The main defenses from the Plow are simple "iron doors" where the point is either raised or lowered and the enemy's blow is knocked aside.
The main defenses from the Fool are displacements, which can curve either up or down during the displacement to the side.
The main defenses of High Stances, Dangling Point and Ox are simple blocks in any direction, point down, displacing the blow.
Basic defenses must be learned from all basic stances. The exercise consists in displacing a simple thrust with a parry from all stances. Try to change footwork, first stepping back while parrying, then to the side, then forward. Check the position opposite each other with your opponent after all possible leg movements.

Depiction of affected areas from De Liberi's Flos Duellatorum. Note that the sword pointing straight up from below is aimed at the neck. He shows the main thrust from the Plow. Diagonal swords meet at the waist and are directed at the four targets discussed in the preface. Two transverse swords are aimed at the upper targets.

Leaf from the treatise Fillipo Vadi, 1485. Here we see a similar representation of the four targets. Note that the cross blades are now directed at the neck, described as the optimal target (see Strikes and Chap. 1 Mayer for more on targets).
Disengagement
There is essentially no graphic material on the topic, as applied to the long sword. The disconnect is more implied than actually depicted.
Disengagement from the opponent's sword is one of the central principles of fencing and is treated as such in the fechtbucher. The principle of disengagement is to prevent your opponent from finding your blade when he tries to do so.
The difficulty with a long sword lies in its mass. Even a sharpened sword is about 1.5 kg heavier and thus more inert than a sword or rapier.
* On the one hand, this means that the speed of release will be limited by the mass and strength of the wrist.
* On the other hand, it's not enough that a moving object tends to keep moving. The additional inertia makes it harder to stop moving.
This is the principle of the slap, where you assist an opponent's already autonomously moving blade by hitting it at the end of the disengagement. Of course, if your opponent expects this, everything can turn against you, since your slap also has its own momentum. This is shown below in double and multiple trips.
Simple trips
Extend your point and point it at the target. When the opponent's blade begins to shift yours, disengage from the opponent's blade by running your far weak under and around his blade. One can assist his blade with an upward spin and a slap and either control his blade in a strike or aim elsewhere.
Applicable in all forward pointing stances and guards.
The exercise for students is to practice thrusting and disengaging along with simple displacement. Students should try to attack each other with thrusts, continue with the displacement and introduce a new action as a continuation. When a student shows a long point and another student moves to displace, we should encourage disengagement and redirection to the long point before thrusting into the second target.
Double and multiple clutches
They consist in repeatedly dodging the enemy's blade with quick redirection, twitching from one side of the enemy's point to the other.
Quick aiming, disengagement, retargeting (and possibly again) is the main thing in an attack. Leads to variations with changing stance, changing aim, and reorienting the blade.
When you have disengaged and circled for a slap, your opponent may move away to displace, or even disengage in turn. Multiple trips include repetitive probing, feints, tripping, and retargeting.
Circular movements.
Circular movements are used frequently. Imagine a cone extending forward from your pommel. This is the circle of attack, from which you can go to any point.
Circular disengagement is the circular movement of the point above and/or below the opponent's point. AT general view it leads to a stroke from the circle, or a stroke from a similar level. (See below for introduction of round robin and level match).
The level match often comes out of a circular motion either up and over or down and under the opponent's point. From different plans, disengage and continue the curve until you are parallel to the enemy's blade. When the angle matches, chop.
Matching the level often leads directly to a new level crossing and tip rebound, allowing a change in angle of attack, breaking through the protection of the tip. This is called Through Shift, or Durchwechselen. See Zuther, p. 15 for a description of the hit that corresponds to when changing levels from Fool or Dangling Tip.
Fencing textbook
(Note from the site - these materials belong to http://www.aemma.org/ Academy of European Medieval Martial Arts. Data on authorship and translation of the text into Russian will be added later)
Foreword
This series of instructions is based on a three-year study of late medieval and early renaissance fencing manuscripts, supplemented by field experimentation. These manuscripts are mostly of German origin and are known as fechtbucher, or combat books, in the sense of fencing manuals. These textbooks date back to 1389 from the teachings of Master Johann Liechtenauer. The style, in fact, was much earlier, it just so happened that some of its students were among the first masters to publish detailed manuscripts describing various medieval martial arts. These treatises focused mainly on the fighting techniques used in German judicial duels. In most cases, these duels were fought without armor, and the main weapon was a long sword.
This research led me to certain views regarding the beginnings and development of modern Western swordsmanship. The curriculum presented here has been drawn up according to the instructions presented in the sections of fencing textbooks devoted to the long sword, with the addition of my personal experience as a student. Most of the books also describe other weapons such as the rapier and dusak, but they always start with the longsword, which was considered the basic weapon for learning swordsmanship, regardless of subsequent choice. Unfortunately, the study of the long sword, as well as some other swords, fell out of fashion in the 17th century and now only part of the once large field of disciplines is called Western swordsmanship.
This analysis and instruction is intended to help restore the longsword to its true place as a key element in the vast art of swordsmanship.
1. Where to start
2. Main guards/racks
4. Offset
5. Decoupling
7. Principles of attack 2,3,4: Strikes
8. Master strokes
9. Leaving and counter injections
11. Secondary uprights/guards
12. Racks of last resort
1. Where to start
Gear Tips
* Beginner (Vaster) Hickory Vaster
* Fencing mask
* Gambeson or similar padded jacket
* Rigid mittens or thick padded gloves
* Knee and elbow pads
* Optional: cuirass or other chest protection, shoulder protection
Note: wooden weapons are used only by beginners, the vaster is not used in a duel. Students should switch to steel within 6 months. Students wishing to start with steel must provide themselves with the minimum equipment for a duel on steel (see below)
* Duelist (steel) Finely poised long sword (from 110 to 140 cm, 1.3 to 1.8 kg) without a sharpened tip and blades.
* Balaclava (steel tile - optional)
* Fencing mask
* Knee pads, elbow pads, shoulder protection
* Gambeson or the like.
* Cuirass or other rigid chest protection
* Bracers (leather or steel)
* Steel gauntlets.
Crossed and open grip

As you can see in the figure, there are two main grip positions: closed and free. A closed grip is any grip where the wrists are crossed. Free - this is a grip in which the wrists do not cross. The grip should be light and relaxed, more like holding a fishing rod than a baseball bat. Avoid "dead grip", because. it reduces mobility.
The three phases: Opening, Clearing and Closing correspond to Mayer's and Suther's Beginning, Middle and End phases of fencing with a long sword. There is a rough correspondence between the three phases of combat and the three phases of the instruction presented here:
* Opening - initial stances, defenses, eye and distance keeping, simple probing and distracting maneuvers. The main goal of the opening phase is to gain an advantage.
* Clearing - opening up an opportunity for attack (the action of cleaning the tip / blade, achieving a clear and open target). The clearing method is applied depending on the opening methods.
* Closing - various methods of attack. They range from thrusts to cuts and throws. The closing method depends on the trimming method.
Before and after
Before - all the movements you started
After - all the movements started by your opponent.
Four targets
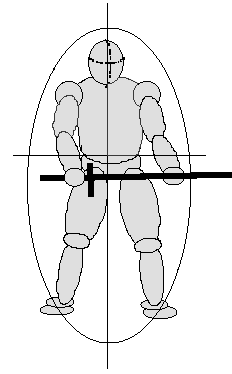
Divide the body into quadrants with an intersection at waist level. This produces four main targets: top, bottom, left, and right. The principle of four guides is applied in all areas. There are four main defenses, four main attacks, and four main counterattacks (because there are four targets).
In the figure we see an image of the whole body, divided into targets. Each part is a quadrant: High, Low, Right and Left. The circle around the body is a circle of protection that must not be overcome. The quadrants can be reached by two main methods: thrust and cut.
Four targets
Exercises
Stretching: Spend about 10-15 minutes stretching your arms, back, and legs.
Stances: Essentially the stance of a swordsman riding an elephant, with either foot in front.
Try to open as small an area as possible. It is possible that longswords were designed with longer hilts than their half-handed predecessors, not only to increase leverage when striking, but also because the longer hilt allows the left hand and left shoulder to be held farther back in the stance. Plow or Fool (see Main racks). This reduces the area of effect for the enemy.
Footwork 1: Substep and pass
Side step - movement of the foot that is closest to the direction of movement. For example: if you are moving forward, move your front leg first, if you are moving backward, move your back leg first.
A passing step is to pass one foot past the other, thus changing the front foot.
* Exercises 1 The square step is a good exercise. Move forward, then right, then back, then left until you are in the starting position. Perform step by step. Repeat with the other lead leg.
* Attached step anterior-anterior-passing and prick; attached rear-rear-passing and protection. Perform with various hand exercises. Try variations.
Footwork 2: Snatch and lunge
All textbooks say the same thing: when attacking from the left, step with the left foot, and when attacking with the right, step with the right foot. At first glance, this is too simple. This simple rule applies to all stances, no matter which foot is in front. There are two points in this tutorial:
1. Avoid crossing your counter at all costs
2. Never turn your back on your opponent
Let's repeat the rule in a more simplified way: when stepping to the left, step with your left foot, it doesn't matter if it is in front or not. When stepping to the right, step with your right foot, whether it is in front or not.
* If your back foot passes your front foot in a passing step, you are in a snatch.
* If you thrust forward with your front leg, you are lunging
Sword exercises
* 20 injections from the bottom of the right and left hands.
* 20 injections from the top of the right and left hands.
* 20 injections with two hands from the right Plow, then 20 from the left.
* 20 transitions from left to right Ox and back. Keep the point forward throughout the transition - don't flicker (see Basic stances for an explanation of the Ox stance).
2. Main guards/racks
There are four main stances: Plow, Ox, Fool and Roof.

The plow is often confused with the middle tine (see below). This is the basic en-garde position with either foot in front. The hand at the guard is slightly to the side of the leading knee, the blade is directed straight forward, the point is at the level of the opponent's chin. The brush on the pommel is slightly to the side and in front of the leading hip. As with other swords, the "wall" must be represented from the outside. The sword continues this wall.
The plow can also be turned by holding the sword in front of an extended thigh. This is a closed rack. It allows you to get close to the enemy while maintaining blade control.

Liberi Window or Zuter's Bull. The bull is also known as the two-horned stance. In the Right Ox, the hand at the guard is raised to the level of the ear on the right (for a right-hander). The brush is on the pommel at the back, the wrists are crossed. Left foot forward. The tip is ahead and threatens the top level of the opponent.

In the Left bull, the stance is reversed, and the grip is free. See also Maier, p. 6
Fool is the front loose stance. In this position, the front arm is extended forward in a free grip. The blade is held forward and slightly down. Either foot forward.


The roof is a high rack, a point above the head. It is the only basic stance in which the point of the blade is not pointed at the opponent, and is thus the only stance not used in the wall method. She, like the bull, is a left-handed stance and starts all shoulder strikes well, as well as the zwerchhau or breaking attack.

Another view of the Fool and the Roof - see Goliath, p. 62.
For more on all four basic stances, see Mayer's "On Postures or Postures".
3. The first principle of attack: Stab / Point
Thrust is the principle following the Wrathful Edge, or Zornort. The thrust is the first principle of attack. Direct hit.
There are four principles of attack:
* Vertical,
* Diagonal,
* Horizontal and
* Direct, which underlies the four principles of attack.
Wrathful Blade is the first lead attack. All the rest are cuts (over, under, angry, and sideways), which are covered in chapter 7.
Basic thrusts must be practiced from all three basic stances (except the roof).
* injections can be with a simple step - a forward throw from the leading leg - a lunge.
* injections can also be performed with a passing step - passing forward from the back leg - a throw.
Exercises
* From the main stances, perform: arm extension (long point)
* shot at a short step (lunge)
* injection with a passing step (throw)
Practice until you can hit a target the size of a buckler or a hand in a gauntlet.

Fiore dei Liberi (1410)
Long point: From the plow or closed stance, extend the arms and point.
Langer Ort - long point. Initiate any thrust from the Plow by raising the arms into a long point, where "point" is understood as the act of aiming. You must aim at your target in order to hit them with a thrust.

Hans Talhoffer (1467)
Throw from the Plow: long point and step forward.
Sturzhau - Hinged Kick

Hans Talhoffer (1467)
A thrust from a closed Bull, or a closed point down and forward, is called a hinged blow. The arms will spin out as they stretch. This attack is most effective on a passing thrust or throw (see Talhoffer, sheet 2)
Zornort - Wrathful Edge
An angry point is an injection into the upper level from a free grip (see talhoffer, sheet 3)
Undercuts
* A cutting thrust is any thrust that was intended to be a cut with any blade, but ended with a thrust with the point.
* An undercutting flick is the dribbling of the blade across the opponent during a quick flick of the blade.
Undercuts can start with both thrusts and cuts, and can be used when returning from an over-lunge when the blade is close enough to make contact. Undercuts are a way to strike either during a thrust or during a blade withdrawal.
4. Protection: Displacement 
Hans Talhoffer (1467)
Displacement of the angry tip. Place the point/blade on the side using offset (Talhoffer, sheet 3)
The simplest defenses are blocks that take the threatening tip out of the line. They are also known as displacement (Absetzen). Done correctly, they open up the possibility of riposte.
The main defenses from the Plow are simple "iron doors" where the point is either raised or lowered and the enemy's blow is knocked aside.
The main defenses from the Fool are displacements, which can curve either up or down during the displacement to the side.
The main defenses of High Stances, Dangling Point and Bull are simple blocks in any direction, point down, displacing the blow.
Basic defenses must be learned from all basic stances. The exercise consists in displacing a simple thrust with a parry from all stances. Try to change footwork, first stepping back while parrying, then to the side, then forward. Check the position opposite each other with your opponent after all possible leg movements.
The students should then practice thrusting and shifting, working in pairs. The one who executes the thrust seeks to hit the opponent in the chest / body, while the second tries to defend himself. In this exercise, you need to pay attention to the work of the legs and introduce the principle of distance.
Exercises for students
* From each main stance, offset: short step thrust
* an injection with a passing step.
Blows are applied from all racks, except for the roof.
Fiore dei Liberi (1410) 
Depiction of affected areas from De Liberi's Flos Duellatorum. Note that the sword pointing straight up from below is aimed at the neck. He shows the main thrust from the Plow. Diagonal swords meet at the waist and are directed at the four targets discussed in the preface. Two transverse swords are aimed at the upper targets.

Leaf from the treatise Fillipo Vadi, 1485. Here we see a similar representation of the four targets. Note that the cross blades are now directed at the neck, described as the optimal target (see Strikes and Chap. 1 Mayer for more on targets).
Fillipo Vadi, (1485)
Students should attempt to aim at all four zones while practicing thrusts. Students should try both getting and giving shots in all four zones. This contributes to better aiming in the work of the tip and the game of the blade.
5. Decoupling
There is essentially no graphic material on the topic, as applied to the long sword. The disconnect is more implied than actually depicted.
Disengagement from the opponent's sword is one of the central principles of swordsmanship and is treated as such in the fechtbucher. The principle of disengagement is to prevent your opponent from finding your blade when he tries to do so.
The difficulty with a long sword lies in its mass. Even a sharpened sword is about 1.5 kg heavier and thus more inert than a sword or rapier.
* On the one hand, this means that the speed of release will be limited by the mass and strength of the wrist.
* On the other hand, it's not enough that a moving object tends to keep moving. The additional inertia makes it harder to stop moving.
This is the principle of the slap, where you assist an opponent's blade that is already moving autonomously by hitting it at the end of the disengagement. Of course, if your opponent expects this, everything can turn against you, since your slap also has its own momentum. This is shown below in double and multiple trips.
Simple trips
Extend your point and point it at the target. When the opponent's blade begins to shift yours, disengage from the opponent's blade by running your far weak under and around his blade. One can assist his blade with an upward spin and a slap and either control his blade in a strike or aim elsewhere.
Applicable in all forward pointing stances and guards.
The exercise for students is to practice thrusting and disengaging along with simple displacement. Students should try to attack each other with thrusts, continue with the displacement and introduce a new action as a continuation. When a student shows a long point and another student moves to displace, we should encourage disengagement and redirection to the long point before thrusting into the second target.
Double and multiple clutches
They consist in repeatedly dodging the enemy's blade with quick redirection, twitching from one side of the enemy's point to the other.
Quick aiming, disengagement, retargeting (and possibly again) is the main thing in an attack. Leads to variations with changing stance, changing aim, and reorienting the blade.
When you have disengaged and circled for a slap, your opponent may move away to displace, or even disengage in turn. Multiple trips include repetitive probing, feints, tripping, and retargeting.
An exercise for students follows from the disengagement. We will now introduce multiple trips as part of the duel.
Circular movements are used frequently. Imagine a cone extending forward from your pommel. This is the circle of attack, from which you can go to any point.
Circular disengagement is the circular movement of the point above and/or under the opponent's point. In general, it leads to a stroke from a circle, or a stroke from a similar level. (See below for introduction of round robin and level match).
6. Circular Actions and Level Compliance 
quick curved punch 
successful quick curved punch
Above are folios 19 and 20 from Talhoffer's 1467 fechtbuch. Sheet 19 describes a quick curved cut and a defense by turning the point against it. Sheet 20 shows a successfully executed quick curved strike.
A quick circular disengagement that goes into an attack past the point with a short circular blow is called a quick curved blow.
A fast spinning attack can be stopped by lifting the point up and over the curve of the attack. This is a forward defense that has the ability to counterattack.
This circular movement of the blade can be thought of as a "cone". In a circular attack, a blow can come from any point on the circle. Defenses can thus be either "forward and over" or "down and under".
Note: Meyer's fechtbuch, at the bottom of page 14 shows the Rusher, or Point Drive, in which the principle of the circular point is considered as the blow opener.
Circular attacks and disengages lead us directly to the correspondence of plans. 
Goliath (1500) 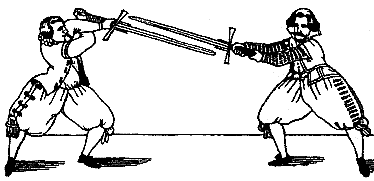
Sutor
These two figures depict level matching. This is when the angle of the blade relative to the body is determined by the opponent's blade, allowing a thrust or strike in parallel. Effective against hands and forearms. Also effective against a point of the body that is in line with the level behind the sword.
The level match often comes out of a circular motion either up and over or down and under the opponent's point. From different planes, disengage and continue the curve until you are parallel to the enemy's blade. When the angle matches, chop.
Matching the level often leads directly to a new level crossing and tip rebound, allowing a change in angle of attack, breaking through the protection of the tip. This is called Through Shift, or Durchwechselen. See Zuther, p. 15 for a description of the hit that corresponds to when changing levels from Fool or Dangling Tip.
Students' exercises should now include experimentation with the new principles of active sparring.
Strikes form three of the four principles of attack: Vertical, Horizontal and Corner. The first principle of attack is the stabbing attack or Wrathful Edge, discussed in chapter 3.
There are four main attacks:
Wrathful Point should not be confused with Wrathful Strike, although they are both aimed at the same target.
Chopping blows are blows in which the blade goes through an arc. They are usually second-level attacks, launched when the point has passed.
* Oberhau / Overhead - A vertical strike to the upper body from above.
* Zornhau / Wrath Strike - A diagonal strike to the upper body from above.
* Mittelhau / Middle Kick - Crosscuts, performed from either side.
* Unterhau / Undercut - Lower body strike from below
The Italian terms for strikes are also divided by impact zone.
* Fendente - Same as Oberhau.
* Squalembrat - Corresponds to Zornhau.
* Traversi - Transverse strike, or Mittelhau.
* Montante - Means up, or Unterhau.
Chopping blows and hit zones
strike pattern 
The figure shows another view of the affected areas. Here are not just the four main kradrants, but also the lines of attack.
Lines passing through the image show cutting directions. But it must be remembered that every quadrant and every line of attack can be associated with a point, not just a blade.
These lines, however, represent pure lines of attack that can be delivered as a slash. When defending against a slash, keep in mind the kill zones and all lines of attack, both for the point and for the blade.
We see full view affected zones. 
The head of the knight is now highlighted with a smaller area of effect. This is due to the fact that the head can be hit both from above and from below, left and right.
Pay attention to two transverse lines passing through the head. One at neck level, the other at eye level. These, along with the lines through the body, are the best paths to attack.
strike pattern
Other types of kill zones can be found in the textbooks of Mayer and Sueter.
Exercises for students: Practice all the punches mentioned above in the style of shadow boxing.
8. Master strokes
Master strokes are not descriptions of strokes. These are the guidelines for release and counteraction.
These include:
* breaking through (Zwerchhau),
* slip (Schielhau),
* splitting (Scheitelhau),
* bending (Krumphau).
Krumphau - Curved Kick 
Krumphau This is an action consisting of stepping/curving away from the line of attack and counterpunch. This is the principle of care.
If the attack is from above, jump to the side, sideways with a crossed hanging stance and counter to the head.
If the attack is from either side, step (ausfallen) from under the blow to the side and forward (vorfallen), turning your body perpendicular to the opponent, being close and facing the arc or line of attack. Now counterattack with a blow to the arms or hands. This is suitable for both cross and upward strokes. So you can beat off the injection.
Excerpt from Goliath:
Krumphau: Curve by throwing your point at the brushes. Dodge from a stance that allows you to hack. The attack prevents strikes and most slashing moves. When the sword falls from above, step back and move away from the direction of the blow. Curve for impact, don't dive. Change straight and strike behind the sword so he doesn't know where to defend himself.
See also pp. 12 of Sueter and Mayer for details.
Schielhau - glancing blow 
Schielhau A glancing blow is a movement to intercept an outside blow from the inside, causing the blade to slide outward during a counterattack. The counter strike pushes back the opponent's blade to end on the inside line.
The principle of the attack is to make the opponent's blade slip.
The principle of defense is to allow the attack to slide out of your blade as you move towards a counter blow. (See Talhoffer, fol. 5, 18; Sueter, p. 8; Mayer, p. 11).
Excerpt from Goliath:
Schielhau: Direct slide breaks punches by dropping them. Strike from the side with your strong and lunge forward as you try to stab him in the neck. Glide straight with inverting the front hand in a thrust until it is on top.
Scheitelhau - splitting blow 
The principle behind the Splitter is the center of the axis, on which you rotate your blade over, under or around the enemy's blade and deliver a direct blow that splits the defense.
Mayer said that the splitter was a head-splitting overhead and that it was duplieren to strike through.
Splitter To compromise between masters, we can say that a splitter is a high cut that starts with a slash and ends with either a thrust or a strike, depending on the defense it meets.
In summary, a splitter is any attack that spins over or around a defense.
From Goliath:
Scheitelhau: Splitting the guard is achieved by a fast forward pass and, depending on the guard he has taken, by direct hitting and breaking the guard with a thrust and undercut.
Zwerchhau - Breaking blow
crossed breaker 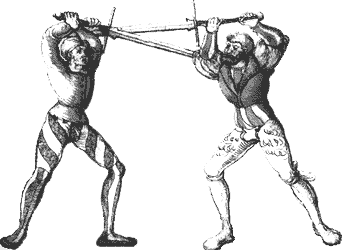
The breaker follows the principle of meeting force with force.
Crossed Breaker (other species) 
The Breaker breaks through an incoming attack with a blade-to-blade strike followed by a counter-attack. 
free breaker

free breaker
If the strike is from your left side (for a right-hander), jump to the right and counter the strike with a crossed hanging stance held high, point down and forward. Now counter with either a sturzhau or a high push with the pommel.
If the punch is from the right side (also for a right-hander), jump to the left and cut off the kick with a high free guard, pointing halfway forward. Now counterattack with a swinging thrust or a high crosscut.
The breaking blow from the Plow consists in simply raising the sword and meeting the blow forcefully, causing it to deflect while the sword is ready for an angry blow.
Excerpt from Goliath:
Zwerchhau: Counterattack from the Roof. Get hooked with the sword and apply force in a counterattack. If from the Plow, it works well against attacks from the Bull. All you need to do is counter-strike by standing more firmly and striking lower and against the force of the punch. Strike and step forward, striking from the elbows. The best is to perform the technique as a single movement, and not divided into two movements, because. in connection, the advantage will be lost.
Note: All the principles of counterattack described above are effective against both blows and thrusts. Any defense that takes the opponent's sword out of play and ends with a counterattack is effective.
Drill: Keep practicing your punching and chopping defenses. Students must not only demonstrate at least two defenses from each blow. They must now apply both displacement and counterattack for each strike.
9. Leaving and counter injections
Be where there is no sword.
Avoiding a thrust is simply stepping away from the line of attack. Any counter-attack while escaping is the principle of both the krumphau and the Wechselhau, the curved and changing strike.
Since thrusts are linear attacks, escaping a thrust consists of moving to the side, left or right, forward or backward. This leads to footwork and the line of attack. The position of your foot and which foot is in front is what largely determines the direction of the exit.
With the right foot in front and when the blow comes to the right of the sword, it is best to dash to the left and forward in a passing step, away from the opponent's blade and facing the line of attack.
When a strike comes from the left of the blade, it is best to push to the right and forward lunging to the side, turning to face the line of attack. These moves are said to be the best because they allow you to close by hitting the edge.
With the left foot in front, all of the above remains valid, only the directions change.
The principle of departure is the same principle of movement discussed in the introduction. When moving to the left, step with your left foot, whether it is in front or not. When moving to the right, step with your right foot.
Stepping back and turning also avoids jabs. Again, the direction of the turn depends on which foot is in front and which side of the blade is hitting.
If your right leg ahead and the strike comes from the left side of the blade, you can turn your left foot around to face the line of attack. The escape also works with the left foot in front - turn back and to the side with your right foot. There is no practical counterpunch when stepping forward with the front foot. This is just care.
The choice of Curved or Variable Counter depends on how you position your blade on the escape:
* If you raise your blade while walking away, the counter-blow will be downward - slashing krumphau.
* If your point is pointed at the opponent, the counter-strike will be a stabbing Krumphau. If the sword is low, an upward cut or Wechselhau will follow.
Leaving and counterattack with a slash
Exit and re-entry into the circle
Avoiding a slash is based on the same principle as avoiding a thrust, but with the addition of an arc of attack as opposed to a line of attack.
An overhand escape (fendente) is carried out by pushing forward and outward with the front foot, raising the arms to counterattack and turning inward towards the line of attack. Then a blow is applied to the hands or forearms.
Diagonal attacks:
* a jerk is performed to the side of the opponent opposite the attacking side, forward from the outside leg.
o If the outside leg is already in front, then a push step is used instead of a snatch.
o If the outside leg is behind, the snatch will be a passing step.
* Raise your arms while stepping outward and turning inward.
* Counterattack with a punch to the arms.
Cross attack:
* step back, raising the blade, or lower it down. If the sword has been raised, respond immediately with fendente after the opponent's sword point passes you.
* If you have lowered the blade, raise the point and step with a thrust just after the opponent's point passes you.
Ascending attacks: actions are similar to avoiding diagonal attacks. The difference lies in the fact that one must always lower the blade before an upward strike in order to be able to pass under the arc of attack and attack the enemy.
Hits from below-up are neutralized in the same way as hits from above-down, only the blade must be lowered.
Exercise: Students should work in pairs to experiment with escapes and counters from all stances, hitting all four zones against all four stances. Then you should continue to work with escapes and counters, inflicting them along all eight lines of attack.
10. Nachreissen: following behind
Following the tip
When your opponent withdraws the point from any attempt or attack, you must use the opportunity to follow his point with your own and try to hit the opening until the point returns and does not threaten.
To avoid pursuit, it is important to retreat not with the sword, but with the foot. Always try to draw back at the long point. Try not to take your hands away when aiming, disengaging and reaiming.
Following under the rising blade
* If your opponent pulls the tip of your sword away from you while yours is still in play, you have an opportunity to attack.
*>When your opponent's arms are up to strike, try to follow the movement to strike under them.
In order to avoid such following, always make sure that your opponent's point is not aimed at you, whether you are preparing to attack or not.
Try not to knock down the opponent's blade, because. the most powerful blows to the blade are often the easiest to avoid. As a result, the tip goes out of play, leaving your opponent with a wide choice of places to attack. 
Goliath, p. 83 The drawing shows a counter-attack where the left fighter dodged the unterhau and followed the rising blade to deliver an angry thrust.
11. Secondary racks/protections
The crossed stance (Schranckhut) is a blocking stance with crossed arms held forward and to the side. The tip is directed towards the ground. 
J. Sutor Hangetort - A free-handed stance in which the sword is held forward and slightly to the side. The tip is directed slightly downward, the right leg is in front. It is similar to the free Bull, but more directed up and forward.
The key (Schlussel) is both a good transitional and provocative stance. It gives a "cocked spring" stance that is difficult to take with a rush, although it looks vulnerable and can provoke a rush response. The left foot in front of the sword is held in front of the chest with a crossed grip, the blade rests on the left hand above the wrist. 
J. Sutor Change (Wechsel) is a transition stance that allows upward strikes. Performed with either foot in front.
J. Sutor's wrath stance 
Wrathful edge.
The wrathful stance (Zornhut) is both threatening (angry) and provocative (feminine stance):
* She provokes by looking vulnerable and can cause a quick reaction.
* She threatens because "fully raised" for an angry strike.
This is a stance with the left foot forward, the sword held over the right shoulder, the blade suspended across the back with the point slightly forward. The weight is shifted 2/3 to the right or back leg.
Wrathful Edge (Zornort) - a high stance, the tip is directed directly at the enemy's face, or in the upper zone. It is nothing more than a long point, only a little less extended and with arms high, both crossed and free. This is a threatening or angry stance that allows you to attack with both the point and the edge.
13. Racks of last resort
The advantage is lost in the connection
Goliath, page 13
Defenses that only block a blow are stances of last resort. They are defenses in which the blades are connected, and the point does not look at the opponent. Any counterattacks from these stances must be delivered after the incoming strike is blocked, which is why they are called "double-tact" counters. In this case, your opponent will have time to return the blade and react to your counter.
The studs of last resort are called Doors, Windows, and External Hanging studs. These stances are often done with a step back while blocking, only the hanging stances allow for a slight forward movement.
High window -
this is a stance in which the blade is held horizontally above and in front of the head. The arms may be crossed or free. Used against attacks from above. This stance is nothing more than a deafening defense.
low window -
a stance in which the blade is held horizontally below and in front of the body. She takes you out of the rack and puts you in a bad position. If you must use this stance, you lose.
High door -
akin to a plow, the blade is raised, and the hilt is pushed to the side. It can be either left or right handed. Used against transverse and diagonal attacks from above. If done well, easily passes into Zwerchhau.
Low door -
low relative of the plow. The point is lowered, the sword presses to the side. Performed to the right and left side. Used against ascending attacks. If successful, he moves to Wechselhau.
High External Hanging Rack -
this is a stance in which the arms and blade are suspended high and on either side, the point is pointing down. Suspended racks can be performed with both crossed and free arms from either side. With a successful execution, the tall outer hanging jays progress to either a throwing Schielhau or a sliding Krumphau. It is used against transverse and diagonal attacks from above.
Low External Hanging Rack -
it is a suspended stance held low and on either side. Used against ascending attacks. With a successful execution, it turns into a pommel strike.